Showing posts with label Sewing. Show all posts

Thursday, June 6, 2013

Binding My Blog Planner


I want to do a better job at posting new post to myblog.  I want toshare more with everyone.  I also need to keep my thoughts together.  Hmm, what was I saying.  Oh, yes.  So I wanted to make a blog planner forever now and just got to it.

I am using a free blog planner printable from here, http://www.infarrantlycreative.net/2012/02/free-printable-blogplanner.html. She did a wonderful job and made a video on it too.

So I wanted to make one.  I decided to make one using my binding system I got at the FPEA convention.  I was so excited to find this, that I had to take it home.  You can find it here, http://www.bindingbooksbeautifully.com/index.html.


I would love to call this a tutorial, but I think it is more of just a show how it went together.

So I got it all printed out, again I am making it just like Infarrantlycreative did her planner.  Except she went to the store to bind it and i did mine at home.

Then I got my binding things.

Next I got my covers.  I used craft card stock from just stampin up.  I like it because it is pretty sturdy.  
So here is where I just go my own way.  I love all the creations made by Lisa Cannon. If you go to her website you can see the fabric covers and man they are WOW!  For this project I really don't need a cover like that.  I am very happy to just have a good soft cover.  In the future, you will probably see a lot of soft style covers versus a hard covered fabric cover.  This is purely my preference.  I bind a lot of free books off google books.
The file folder is to create the divider for the month calendar just as she did in the video.  next I trimmed the file folder to fit the cover.


so first order of binding was the monthly calendar on the file folder.

to make it stay I used the big clips from staples.

To make sure I got the holes where i wanted them, I drew a line across the top.


I forgot to take a picture of lining it up.  In order to fit it in the bracket vise, I folded the file folder back.
here it is out and then I stitched it together.


here is the file folder altogether.  see the holes on the otherside?  that is because I had to fold it over to get it to fit in the vise

Next, I am assembling the rest of the book.  If you look close you can see that I have notebook paper at the front and back.  I like to take notes.  Now the file folder part with the monthly calendar is flipped out and the rest of the file folder is in to be bound. 
here is another view.

Then I stick it in the vise.

now i got it in and got the nails set, now take it apart.Now this is not how it is supposed to come apart.  My little engineering brain has concluded that I gripped the paper too tight and paper being wood held onto those nails pretty good. (if you want to know about this phonemina watch How stuff Works?  On Netflix about wood.).  But with some work it came apart.

Here are all my holes to stitch.
Then, I stitched and was finished.
Turned out great, have a look.
see, the monthly page can be teared off for the following month and the pad can flip out to hide the weekly pages, just as in the blog tutorial for the planner.

I like it!
I usually bind with hot glue and vices and the Your Story from Provo craft.  i like this better.  My fingers were not burned from the hot glue.  I had more control and not near the mess.  I plan to be stitching my binding from here on.

This little system runs $35 at http://www.bindingbooksbeautifully.com/order.html

Now let see if my planner gets me to do my work!  Just a hint, I now plan to bind the kids portfolio for school this year, well, if I get those portfolios done in time.

~trish
fyI - if you ever wonder why my caps are all squirrel-ly.  the monkey broke my shift key and i am still training my brain to use the shift on the right.

Friday, March 18, 2011

Simplicity 2388 Review

So I had a horrible time yesterday to get this uploaded!  So it is finally here.  Remember, check the sale at JoAnns coming up on Simplicity Patterns for 99cents.

I used Simplicity 2388.

See yah!

~trish

Thursday, March 3, 2011

Flogging my home sewn purses


Here is my first ever flog!  I decided to start flogging, since I do not have much time.  Of course, my 1st one is about 12 minutes.  hopefully, you will still love me.

Homespun threads for the diaper bag: http://myhomespunthreads.blogspot.com/. All of her patterns are free.  She has an awesome bible cover pattern.

Kat at Kaydeebunz that is a notorious inspiration to me! http://craftymomma2.blogspot.com/

sew Mama, sew has the free Amy Butler pattern: http://sewmamasew.com/blog2/?p=11705.  Sew mama, sew has a nice collection of tutorials and patterns for FREE.

I think that is everything I said I would link.  If you are local and wanted to know about me working at the cow, head over to www.craftincow.blogspot.com to see what all that is about.

Please let me know if you liked my unedited, basic flog.  And if I should continue.

Have a great day!

`trish

Saturday, January 1, 2011

Inspired to be recover

DSC08695 


Here is my best highchair ever.  It was about $50 at Target a couple of years ago.  After a few kids later, the cover had gotten a bit yucky!  SO I had to get a bit of stitchin done.  I hope you like it.  I absolutely love it.

 DSC08697


DSC08686

Now I did manage to lose the latch part of the buckle, so I picked up a buckle from Walmart for $2.  It was originally a 3 point buckle.  The bottom strap I subbed for a 2 point, making the bottom strap a loop for the top to thread through.

We are loving it!  I think I might make a few bibs to match.

~trish

Wednesday, December 22, 2010

Another apron I made.

DSC08552

I made this one for a good friend of mine.  I can’t believe she made me soil myself with SU fabric. 

GO GATORS!

Tuesday, December 7, 2010

Christmas Apron

I feel bad that I haven’t really been able to share great things with you.  Mostly it is because, I have no time to spare.  I am still doing some great things here and there, but mostly I am driving aimlessly around, unsure where my next direction is.   This school thing is making my head foggy! 

I drive them here and there and then turn around to be right back to where I left them.  I can’t even get a grocery list finished, much less a meal plan.  At this point, I just grab the sales and coupons from www.southernsavers.com and make due with what I have. 

I did start making Christmas gifts early November, so I have a huge lead on that.  But I am also helping my mom out with a new craft studio that my cause a bit of distraction with www.craftincow.blogspot.com. I really need to be posting stuff on craigslist.  See, here I am again rambling.  Let me show you what I made this last time.

DSC07935 DSC07936 DSC07937 DSC07938

This is a little apron I made out of a pair of jeans for the Christmas.  I grabbed the 3D flower from Make it and Love it blog.  The stamping is done with Stazon Ink, it showed up the best.  I did get the bedazzler out for the gem stones. 

Of course, I got this great idea from mimi at Paper Rose studio!   I added tulle thanks to the bright ideas of Barb from dinner in a pinch!

I love how cute it comes together.  I have so many more to make as gifts and also a baseball snuggi.  I can’t wait to show you that.

I did find a great new cooking/frugal/pantry resource: http://everydayfoodstorage.net/


I feel a bit lost with out keeping you in the loop of my creations.  It gives me some steadiness to know that I am able to share the little things I figure out each day!


Keep warm!

~trish

Friday, August 20, 2010

High Chair makeover!


I am feeling back to normal, now that I have enrolled my kids into the public school system.  I can melt away telling you how my heart broke and the reasons we came to this decision, but I will leave it to another time.  I really want to share with you something I have been wanting to do and today, I did it.  I made over a highchair that was given to me.

AFTER

 DSC06963

BEFORE

DSC06962

I do want to say, by Monday, I plan to start back where I left off in conversation, as if the last 2 weeks we were on pause.  So, Saturday night I will be pulling the name for the #2 giveaway.  So you still have a chance to win.  I will show giveaway #3 on Monday.

~trish

Tuesday, August 3, 2010

Suepe’s Big Bag – Pink Tropical

  DSC06803

I want to start sharing my mom’s amazing bags! I can’t wait to describe them.  These bags are heavy duty bags, with some sturdiness. The front side has 2 pockets, one with a zipper.

The other side has one large pocket perfect for papers and file folders.

DSC06799   

On each end she put these amazing drink pockets.  She used string doo-dads to keep your drink secure.

DSC06805

Check out the inside!  I love the stripes inside. One side has a dual pockets and a strap for your keys!

DSC06802

On the other side has 3 pockets.  The middle one has a Velcro closure.DSC06801

The top zips close, so you can keep things secure.

The bag is 18” wide by 15” tall by 5” deep

This bag is available for purchase.  There is only this one.  There is not a bunch of bags that are from this fabric combination, that is waiting to be purchased.  SO if you love it, jump on it, or it will be gone.

Suepe’s Big Bag – Pink Tropical    $120 plus tax and S&H--  BUY NOW

Thursday, July 29, 2010

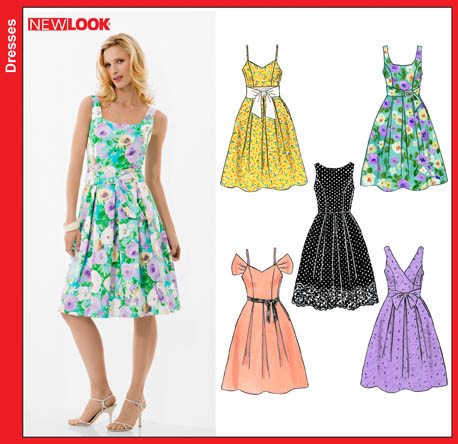
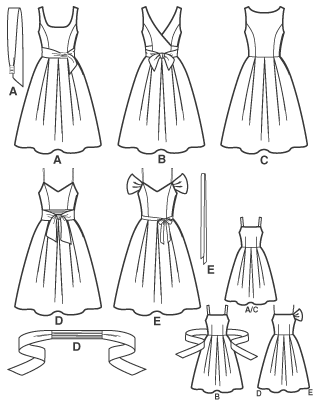
NEW LOOK 6805


Ever see a dress and go WOW?  Best yet you notice it is made with some of your favorite fabric that you have stashed away.  Well I did and then I had to chase here down for details on the pattern. No Shame Trish, here.  Here she is!  Isn’t here dress amazing, even better is how she dressed it up, honestly I am in envy because I would have never have thought to add the sweater and the necklaces.
DSC06600
She said
“It’s a great pattern, easy to use and goes together well. It’s a little short waisted.”
Short waisted is an easy fix.  You can typically find the pattern at Jo-Ann's.  I have noticed that they are no longer at our Wal-Mart.
  68056805
Hopefully, my post baby body will be its more normal shape so that I can make one of these for my wardrobe.
~trish

Wednesday, July 28, 2010

Baby Shower Gifts


This is what I am doing on our week off, plus a dr appointment, and doing speech class!

I have a baby shower coming up this weekend and wanted to make some little things for the new mom.  All of these items I have seen on other blogs and got some great directions and measurements from www.makeit-loveit.com under her baby label.

I used the printed fabric and a light green flannel for all the pieces.

First is the 2 bibs.

DSC06770

Then the huggies wipe covered and the diaper pouch.

DSC06770

Then I made a baby carrier cover with a padded handle to keep the noisies away from the baby.

DSC06771

I had plenty of fabric, because I bought it with the intention of making a dress for me.  I think I like it surrounding a baby better.  These items took me about 5-6hours to make, including time to change dirty diapers, nurse a screaming baby, and break up the typical sibling rivalry.  I am hoping the mom to be will love it.  I really should have made one for myself.


DON’T FORGET I HAVE A GIVE-AWAY GOING ON THIS WEEK.  YOU MUST COMMENT (on this blog, facebook comments do not count) AND BECOME A FOLLOWER!

Wednesday, July 7, 2010

wearing a baby!

DSC06434 

#3 was wanting to be a little mommy.  She was “wearing” her babies by throwing them into a pillowcase and throwing them over her shoulder.  At first, I thought she was wanting to be a hobo.  But after watching her for a little bit, I realized she was wanting to wear them.  So I grabbed some fabric and put together a little baby sling for her.DSC06435

she is so cute, but not to be confused, oh my, this child here is a rascal! She will earn me every white hair I have.

~trish

nursing cover

DSC06461


A recent friend I met was sporting one of these nursing covers.  Now being on my 4th child and had nursed all the others, I never used a nursing cover before.  I have seen them, but I really did not have an interest in them for several reasons. First, all the ones I had seen were very bulks and it was almost like putting on another garment.  Second, I did not feel in need of one, because I am really good at maintaining cover and wearing my clothes and positioning the baby so nothing was in view.

I am not sure if it is now that I am older or that I have too much whirl-winding around me with the younger ones, but I wanted a cover.  I guess, I am just too tired to put up with the effort of trying to conceal myself from the public and it is easier to just cover.  The nice part about the cover, is that you do not need all those fancy tops to wear.

I was really excited to hop on the tutorial, here:

   http://blisstree.com/live/free-pattern-to-sew-your-own-nursing-cover/?utm_source=blisstree&utm_medium=web&utm_campaign=b5hubs_migration

The nice addition that makes this easy to use is the boning at the top, that gives the cover a tent like shape.  Thus, allowing you to peak in with out lifting the cover, also, helps air flow.  BECAUSE NURSING MAKES YOU HOT!

DSC06462DSC06463

Now the young lady in the pictures is my very young sister in law.  I had to take advantage of her holding #4 and I went a head and used her as my model.  I am getting a little bit  reluctant to allow my darling husband to take any more horrible pictures of me.  I truly believe he does it intentionally.

~trish

Monday, June 28, 2010

Baby Wearing


I have had several baby slings and carriers, but these are still my favorite.  And even better is that I made it.  I have tried the style, were you wrap them in different positions using the same piece of clothe.  But I found that I like these best, with a little up front work, it keeps it easy for me to use.  Here is a picture of me and my cousin wearing our babies.  Our babies are about a month apart.

IMG_1414

You can have easy access to the babies from the side if they are tiny and as they grow, from the top.

IMG_1416

The pattern is a good pattern, but the directions are misleading, to say it best.  You will need some experience in sewing, not because the techniques are challenging.  It is because the directions will not direct you to the desired finished product.  I have bought this pattern twice, most recently,because I could not find the other pattern.  The second pattern had an extra pattern piece to cut.  With that said, once you build it once, it is minimal effort to create again and again.


McCalls Pattern 5678M5678


I have also made the sling.  I actually prefer this sling verses any I have owned.  I like that it sits the baby more at your abdomen, verses your chest.

I hope you enjoy!

~trish

Tuesday, June 22, 2010

Reading cushions.

 DSC06369 On one of my late night blog crawling, I seen a cute version of making a cushion.  I believe Pottery Barn was the inspiration.  So I took off to make one and try my hand at piping.  Oh must say, I love piping, especially since I do have a piping foot for my sewing machine.

I made the cushion 20 inches wide and 5 inches high.

 DSC06368 I interfaced all sides of it and also put a handle on the cushion.  I used about a pound of poly-fil to stuff it.  The cushion went together quickly.  I like the idea of the circles because I am going to make 2 more and they should easily stack.  My daughters love it.


DSC06370